Saturday
Sep292012

ROAD TRIP JOURNAL #2

I think we were driving through Iowa. I was working at the table in the back of the RV and I hear Richard say "Holy Crap! That was the biggest turbine blade I've ever seen!" I immediately look out the window to see ... nothing! I thought he was looking at a windmill. But no, he saw a single 100' turbine blade being driven down the highway strapped to a flatbed!

Of course, I didn't know this, so I go back to work. A few minutes later, Richard says "Holy Crap! Here comes another one!" This time, I look out the window and I see it.

Thinking on his feet, Richard says "Grab the camera! They come in threes!" I grab the camera and hand it up to Richard.

Sure enough, here comes another one. Snap! And then, another, and another...

Turns out Iowa is swimming in windmills. 


Wednesday
Jun132012

Automatically Adjust Input Gain During Speech Recognition

When we use speech recognition on our Windows 7 machine, the last thing most of us think about is the record level of our microphone. If it's too low, recognition will not be accurate because the system can't hear you proporly. If the level is too high you will overdrive the amplifier and again, the result is low accuracy.

If you are lucky enough to be a .NET developer you can use a neat little trick to automatically adjust the input gain.

Here's the XAML for a simple window that shows an audio level meter and a slider for manually adjusting the input gain: 

<Window x:Class="AudioGainTestCS.MainWindow"     xmlns="http://schemas.microsoft.com/winfx/2006/xaml/presentation"
    xmlns:x="http://schemas.microsoft.com/winfx/2006/xaml"
    Title="MainWindow" Height="350" Width="525">
    <Grid Height="273" Width="427">
        <ProgressBar Height="37" HorizontalAlignment="Left" Margin="12,12,0,0" Name="ProgressBar1" VerticalAlignment="Top" Width="403" />
      <Slider Height="26" HorizontalAlignment="Left" Margin="12,55,0,0" Name="Slider1" VerticalAlignment="Top" Width="403" Orientation="Horizontal" Maximum="99" />
        <TextBox Height="175" HorizontalAlignment="Left" FontSize="30" TextWrapping="Wrap" Margin="14,86,0,0" Name="TextBox1" VerticalAlignment="Top" Width="401" />
    </Grid>
</Window>


C# Code:
using System;
using System.Collections.Generic;
using System.Linq;
using System.Text;
using System.Windows;
using System.Windows.Controls;
using System.Windows.Data;
using System.Windows.Documents;
using System.Windows.Input;
using System.Windows.Media;
using System.Windows.Media.Imaging;
using System.Windows.Navigation;
using System.Windows.Shapes;

namespace AudioGainTestCS
{
    /// <summary>
    /// This application automatically adjusts the record level (input volume)
    /// as you use speech recognition. A mismatched record level can be 
    /// disastrous if you're going to use speech recognition. Note that for
    /// this demo, I'm using a DictationGrammar, but it works with any grammar.
    /// 
    /// The key is the WaveLibMixer.dll, which you can find on CodeProject. 
    /// This library lets you get and set levels and other controls associated with
    /// audio devices.
    /// 
    /// The SpeechRecognitionEngine raises an event on a regular interval passing in
    /// the volume at the input device. When you are not speaking this level is close
    /// to zero. When you are shouting it's closer to 99.
    /// 
    /// Given the volume of speech over time and the ability to control the record level
    /// dynamically, well... it's pretty darned easy to automatically adjust the
    /// microphone for the speaker.
    /// 
    /// Don't get caught without this nice little tool!
    /// 
    /// Carl
    /// </summary>
    public partial class MainWindow : Window
    {
        // -- Add a reference to System.Speech
        private System.Speech.Recognition.SpeechRecognitionEngine speech = new System.Speech.Recognition.SpeechRecognitionEngine();
    
        // -- Add a reference to WaveLibMixer.dll, which you can find at:
        //    http://www.codeproject.com/Articles/11695/Audio-Library-Part-I-Windows-Mixer-Control
        private WaveLib.AudioMixer.MixerLine audioLine;
    
        private Int32 peakLevel;

        public MainWindow()
        {
            InitializeComponent();
            this.Loaded+=new RoutedEventHandler(MainWindow_Loaded);
            speech.AudioLevelUpdated+=new EventHandler<System.Speech.Recognition.AudioLevelUpdatedEventArgs>(speech_AudioLevelUpdated);
            speech.SpeechRecognized+=new EventHandler<System.Speech.Recognition.SpeechRecognizedEventArgs>(speech_SpeechRecognized);
            Slider1.ValueChanged += new RoutedPropertyChangedEventHandler<double>(Slider1_ValueChanged);
        }

   
        private void MainWindow_Loaded(object sender, System.Windows.RoutedEventArgs e) {
            // -- Create a new input mixer object to control an audio input device
            WaveLib.AudioMixer.Mixer audioMixer = new WaveLib.AudioMixer.Mixer(WaveLib.AudioMixer.MixerType.Recording);
            // -- Open the default recording device
            audioMixer.DeviceId = audioMixer.DeviceIdDefault;
            // -- Does the mixer have lines? It ought to...
            if ((audioMixer.Lines.Count > 0)) {
                // -- Select the first line, which is usually the Master Volume
                audioLine = audioMixer.Lines[0];
                // -- Does that line have a Volume control? It really ought to...
                if (audioLine.ContainsVolume) {
                    // -- Set the input volume (record level) to 50%
                    audioLine.Volume = audioLine.VolumeMax / 2;
                    // -- Set up the slider min/max and value based on the volume
                    Slider1.Minimum = audioLine.VolumeMin;
                    Slider1.Maximum = audioLine.VolumeMax;
                    Slider1.Value = audioLine.Volume;
                }
                else {
                    // -- Jeez... lame.
                    Slider1.IsEnabled = false;
                }
            }

            // -- The progress bar is used as an audio meter. 
            //    The speech recognition engine gives us a volume value from 0 to 99.
            //    So we set the ProgressBar min and max accordingly
            ProgressBar1.Minimum = 0;
            ProgressBar1.Maximum = 99;
            // -- Set the speech synthesizer to use the default audio input device
            speech.SetInputToDefaultAudioDevice();
            // -- Tell the speech synthesizer to recognize plain speech, not commands.
            speech.LoadGrammar(new System.Speech.Recognition.DictationGrammar());
            // -- Start recognizing
            speech.RecognizeAsync(System.Speech.Recognition.RecognizeMode.Multiple);
        }
    
        private void speech_AudioLevelUpdated(object sender, System.Speech.Recognition.AudioLevelUpdatedEventArgs e) {
            // -- This is an event handler that happens on a regular interval.
            //    The e.AudioLevel is a value from 0 to 99 representing the 
            //    volume of the talker's voice in almost real-time.
            // -- Setting the progressbar value to this level creates an audio meter.
            ProgressBar1.Value = e.AudioLevel;
            // -- If the volume is over 70% loud, knock the slider down a bit
            //    which will in turn drop the record level
            if ((e.AudioLevel > 70)) {
                Slider1.Value -= 1000;
            }
            // -- Keep track of the peak level for this sentence.
            if ((e.AudioLevel > peakLevel)) {
                peakLevel = e.AudioLevel;
            }
        }
    
        private void speech_SpeechRecognized(object sender, System.Speech.Recognition.SpeechRecognizedEventArgs e) {
            // -- This event handler fires after the talker speaks a sentence.
            //    e.Result.Text contains the text that they have spoken.
            // -- In this case, I'm capitalizing the sentence, adding a period at the end, 
            //    and displaying the text in a text box.
            TextBox1.Text = (e.Result.Text.Substring(0, 1).ToUpper() 
                        + (e.Result.Text.Substring(1) + "."));
            if ((peakLevel < 20)) {
                Slider1.Value += 3000;
            }
            // -- Reset the peak level
            peakLevel = 0;
        }

        void Slider1_ValueChanged(object sender, RoutedPropertyChangedEventArgs<double> e)
        {
            // -- When the value of the slider changes, 
            //    set the audio input volume (the record level) to that value.
            //    This can happen when the user moves the slider, or some code
            //    sets the Slider1.Value 
            if (audioLine != null)
            {
                audioLine.Volume = (int)Slider1.Value;
            }
        }    
    }
}
Monday
Apr302012

Recovering Gracefully from Loss of Skeletal Tracking (Kinect For Windows)

The Kinect For Windows SDK v1.0 is awesome, but it doesn't recover well when it loses sight of you whilst tracking your skeleton. With a timer control and a little code to restart the KinectSensor, you can recover is 5 seconds or less.

This is the same code I use in GesturePak, a gesture recording and recognition SDK for Kinect for Windows.

Create a new WPF application and add a reference to the Kinect SDK assembly:

C:\Program Files\Microsoft SDKs\Kinect\v1.0\Assemblies\Microsoft.Kinect.dll

You don't need any controls for this demo. It simply turns the form red when tracking, and white when not tracking.

The basic idea is that when we lose tracking for the first time, you kick off a timer to fire it's Tick event in 1/2 a second. In the timer Tick handler you stop the Kinect Sensor, Start it up again, and then set the timer's Interval to a more reasonable amount of time. I use 5 seconds, but you should test it in your app. If it's too short, you don't give the Kinect time to track you, and if it's too long and it doesn''t track you, you could be sitting and waiting too long. 5 seconds seems reasonable to me.

When the state changes from not tracking to tracking, you simply disable the timer. 

Here's the code in both C# and VB.NET. In each case you can replace the default code behind MainWindow.xaml and run it. The C# app has to have a reference to System.Windows.Forms

C#

using System;
using System.Collections;
using System.Collections.Generic;
using System.Data;
using System.Diagnostics;
using System.Windows.Forms;
using System.Windows.Media;
using Microsoft.Kinect;
namespace TrackingTestCSharp
{
    /// <summary>
    /// This WPF demo shows you how gracefull recovery when the Kinect loses
    /// skeletal tracking. The Kinect device does not recover well on it's own.
    /// While restarting the Kinect may seem drastic, it's the only way I can 
    /// figure out how to do it. If you find a better way, email me at 
    /// carl@franklins.net. Thanks!
    /// </summary>
    /// <remarks></remarks>
    partial class MainWindow
    {
        private KinectSensor sensor;
        
        //-- boolean to keep track of the state
        private bool isTracking;
        //-- This is the interval after which the kinect is restarted the second 
        //   and subsequent times.
        private TimeSpan autoTrackingRecoveryInterval = TimeSpan.FromSeconds(5);
        //-- Timer used to restart
        private System.Windows.Threading.DispatcherTimer trackingRecoveryTimer = 
                new System.Windows.Threading.DispatcherTimer();
        public MainWindow()
        {
            Loaded += MainWindow_Loaded;
        }
        private void MainWindow_Loaded(object sender, System.Windows.RoutedEventArgs e)
        {
            //-- Make sure we have a sensor connected
            if (KinectSensor.KinectSensors.Count == 0) {
                MessageBox.Show("No Kinect Found");
                System.Windows.Application.Current.Shutdown();
            }
            //-- Start the first sensor, enabling the skeleton
            sensor = KinectSensor.KinectSensors[0];
            sensor.SkeletonStream.Enable(new TransformSmoothParameters());
            sensor.Start();
            //-- Hook the events
            sensor.SkeletonFrameReady += sensor_SkeletonFrameReady;
            trackingRecoveryTimer.Tick += trackingRecoveryTimer_Tick;
        }
        private void sensor_SkeletonFrameReady(object sender, Microsoft.Kinect.SkeletonFrameReadyEventArgs e)
        {
            //-- Get the frame
            dynamic frame = e.OpenSkeletonFrame();
            //-- Bail if it's nothing
            if (frame == null) return;
            using (frame) {
                //-- Bail if no data is returned.
                if (frame.SkeletonArrayLength == 0) return;
                //-- Get the data from the frame into an array
                Skeleton[] data = new Skeleton[frame.SkeletonArrayLength];
                frame.CopySkeletonDataTo(data);
                //-- Is there really no data?
                if (data.Length == 0) return
                //-- Is this skeleton being tracked?
                if (data[0].TrackingState == SkeletonTrackingState.Tracked) {
                    if (!isTracking) {
                        //-- If we weren't tracking, set the background to red
                        // to indicate that we are tracking
                        this.Background = Brushes.Red;
                        //-- we're tracking
                        isTracking = true;
                        //-- disable the timer
                        trackingRecoveryTimer.IsEnabled = false;
                        }
                 } else {
                     if (isTracking) {
                        //-- State changed from tracking to not tracking
                        isTracking = false;
                        //-- Set the background white to indicated we're NOT tracking
                        this.Background = Brushes.White;
                        //-- Since this is the first time we've lost tracking,
                        //   restart after 1/2 a second
                        trackingRecoveryTimer.Interval = TimeSpan.FromSeconds(0.5);
                        trackingRecoveryTimer.IsEnabled = true;
                    }
                }
            }
        }
        private void trackingRecoveryTimer_Tick(object sender, System.EventArgs e)
        {
            //-- Disable the timer
            trackingRecoveryTimer.IsEnabled = false;
            //-- If we're already tracking, bail. 
            if (isTracking) return;
             //-- Stop the sensor, ignoring errors
            try {
                sensor.Stop();
            } catch  {
            }
            //-- Start the sensor, ignoring errors
            try {
                sensor.Start();
            } catch  {
            }
            //-- Come back here in the defined interval
            trackingRecoveryTimer.Interval = autoTrackingRecoveryInterval;
            trackingRecoveryTimer.IsEnabled = true;
        }
    }
}


VB.NET


Imports Microsoft.Kinect
 
''' <summary>
''' This WPF demo shows you how gracefull recovery when the Kinect loses
''' skeletal tracking. The Kinect device does not recover well on it's own.
''' While restarting the Kinect may seem drastic, it's the only way I can 
''' figure out how to do it. If you find a better way, email me at 
''' carl@franklins.net. Thanks!
''' </summary>
''' <remarks></remarks>
Class MainWindow
 
    Private WithEvents sensor As KinectSensor
 
    Private isTracking As Boolean   '-- boolean to keep track of the state
 
    '-- This is the interval after which the kinect is restarted the second 
    '   and subsequent times.
    Private autoTrackingRecoveryInterval = TimeSpan.FromSeconds(5)
 
    '-- Timer used to restart
    Private WithEvents trackingRecoveryTimer As New Windows.Threading.DispatcherTimer
 
    Private Sub MainWindow_Loaded(sender As Object, e As System.Windows.RoutedEventArgs) Handles Me.Loaded
        '-- Make sure we have a sensor connected
        If KinectSensor.KinectSensors.Count = 0 Then
            MessageBox.Show("No Kinect Found")
            Application.Current.Shutdown()
        End If
 
        '-- Start the first sensor, enabling the skeleton
        sensor = KinectSensor.KinectSensors(0)
        sensor.SkeletonStream.Enable(New TransformSmoothParameters)
        sensor.Start()
    End Sub
 
    Private Sub sensor_SkeletonFrameReady(sender As Object, e As Microsoft.Kinect.SkeletonFrameReadyEventArgs) Handles sensor.SkeletonFrameReady
        '-- Get the frame
        Dim frame = e.OpenSkeletonFrame
        '-- Bail if it's nothing
        If frame Is Nothing Then Return
 
        Using frame
            '-- Bail if no data is returned.
            If frame.SkeletonArrayLength = 0 Then Return
 
            '-- Get the data from the frame into an array
            Dim data(frame.SkeletonArrayLength - 1) As Skeleton
            frame.CopySkeletonDataTo(data)
 
            '-- Is there really no data?
            If data.Length = 0 Then Return
 
            '-- Is this skeleton being tracked?
            If data(0).TrackingState = SkeletonTrackingState.Tracked Then
                If Not isTracking Then
                    '-- If we weren't tracking, set the background to red
                    '   to indicate that we are tracking
                    Me.Background = Brushes.Red
                    '-- we're tracking
                    isTracking = True
                    '-- disable the timer
                    trackingRecoveryTimer.IsEnabled = False
                End If
            Else
                If isTracking Then
                    '-- State changed from tracking to not tracking
                    isTracking = False
                    '-- Set the background white to indicated we're NOT tracking
                    Me.Background = Brushes.White
                    '-- Since this is the first time we've lost tracking,
                    '   restart after 1/2 a second
                    trackingRecoveryTimer.Interval = TimeSpan.FromSeconds(0.5)
                    trackingRecoveryTimer.IsEnabled = True
                End If
            End If
 
        End Using
    End Sub
 
    Private Sub trackingRecoveryTimer_Tick(sender As Object, e As System.EventArgs) Handles trackingRecoveryTimer.Tick
        '-- Disable the timer
        trackingRecoveryTimer.IsEnabled = False
        '-- If we're already tracking, bail. 
        If isTracking Then Return
        '-- Stop the sensor, ignoring errors
        Try
            sensor.Stop()
        Catch ex As Exception
        End Try
        '-- Start the sensor, ignoring errors
        Try
            sensor.Start()
        Catch ex As Exception
        End Try
        '-- Come back here in the defined interval
        trackingRecoveryTimer.Interval = autoTrackingRecoveryInterval
        trackingRecoveryTimer.IsEnabled = True
    End Sub
End Class


Wednesday
Mar142012

Getting Started with Kinect For Windows in Visual Studio .NET

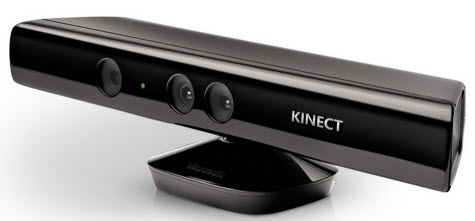
If you haven't heard, Microsoft has released a new version of the Kinect that's just for Windows applications, along with a new Software Development Kit so .NET developers can write apps for Windows that use the Kinect.

Code along with me while I show you how to get started.

Downloads:

This is a 64-bit SDK with a commercial license.

If you're going to use voice recognition with the Kinect, download these:

Download the x86 versions of each of these. Kinect only works with the 32-bit version.

We're going to make an application that simply tracks your right hand, showing the X, Y, and Z values in real-time as you move it. 

Getting Started:

  • Create a new WPF application
  • Add a reference to the Kinect SDK

C:\Program Files\Microsoft SDKs\Kinect\v1.0\Assemblies\Microsoft.Kinect.dll

  • If using Speech, add a reference to the Microsoft Speech SDK

C:\Program Files (x86)\Microsoft SDKs\Speech\v11.0\Assembly\Microsoft.Speech.dll

XAML Source:

Change the default <Grid></Grid> to the following:

    <StackPanel>
        <Label FontSize="30" Content="X" Height="50"
                  HorizontalAlignment="Left" Margin="10,10,0,0" Name="LabelX" 
                  VerticalAlignment="Top" />
        <Label FontSize="30" Content="Y" Height="50"
                  HorizontalAlignment="Left" Margin="10,10,0,0" Name="LabelY"
                  VerticalAlignment="Top" />
        <Label FontSize="30" Content="Z" Height="50"
                  HorizontalAlignment="Left" Margin="10,10,0,0" Name="LabelZ"
                  VerticalAlignment="Top" />
    </StackPanel>

VB Source:

Class MainWindow 
    Private WithEvents Sensor As Microsoft.Kinect.KinectSensor
    Private Sub Window_Loaded(sender As System.Object, e As System.Windows.RoutedEventArgs) Handles MyBase.Loaded
        If Microsoft.Kinect.KinectSensor.KinectSensors.Count = 0 Then
            MessageBox.Show("No Kinect Devices Found")
            Application.Current.Shutdown()
        Else
            Sensor = Microsoft.Kinect.KinectSensor.KinectSensors(0)
            Sensor.SkeletonStream.Enable(New Microsoft.Kinect.TransformSmoothParameters)
            Sensor.Start()
        End If
    End Sub
 
    Private Sub Sensor_SkeletonFrameReady(sender As Object, e As Microsoft.Kinect.SkeletonFrameReadyEventArgs) Handles Sensor.SkeletonFrameReady
        Dim frame = e.OpenSkeletonFrame
 
        '-- Bail if there's no frame.
        If frame Is Nothing Then Return
 
        Using frame
            '-- Bail if no data is returned 
            If frame.SkeletonArrayLength = 0 Then Return
 
            '-- Copy the data to an array
            Dim data(frame.SkeletonArrayLength - 1) As Microsoft.Kinect.Skeleton
            frame.CopySkeletonDataTo(data)
 
            '-- Bail if the data wasn't copied
            If data.Length = 0 Then Return
 
            '-- Are we tracking?
            If data(0).TrackingState = Microsoft.Kinect.SkeletonTrackingState.Tracked Then
                '-- data(0) now contains live data
                Dim X = data(0).Joints(Microsoft.Kinect.JointType.HandRight).Position.X
                Dim Y = data(0).Joints(Microsoft.Kinect.JointType.HandRight).Position.Y
                Dim Z = data(0).Joints(Microsoft.Kinect.JointType.HandRight).Position.Z
                LabelX.Content = X.ToString
                LabelY.Content = Y.ToString
                LabelZ.Content = Z.ToString
                LabelX.UpdateLayout()
                LabelY.UpdateLayout()
                LabelZ.UpdateLayout()
            End If
        End Using
    End Sub
End Class

C# Source:
 
    public partial class MainWindow : Window
    {
        Microsoft.Kinect.KinectSensor Sensor;
 
        public MainWindow()
        {
            InitializeComponent();
            if (Microsoft.Kinect.KinectSensor.KinectSensors.Count == 0)
            {
                MessageBox.Show("No Kinect Devices Found");
                Application.Current.Shutdown();
            }
            else
            {
                Sensor = Microsoft.Kinect.KinectSensor.KinectSensors[0];
                Sensor.SkeletonFrameReady += Sensor_SkeletonFrameReady;
                Sensor.SkeletonStream.Enable(new Microsoft.Kinect.TransformSmoothParameters());
                Sensor.Start();
            }
        }
 
        private void Sensor_SkeletonFrameReady(object sender, Microsoft.Kinect.SkeletonFrameReadyEventArgs e)
        {
            Microsoft.Kinect.SkeletonFrame frame = e.OpenSkeletonFrame();
 
            //-- Bail if there's no frame.
            if (frame == null)
                return;
 
            using (frame)
            {
                //-- Bail if no data is returned 
                if (frame.SkeletonArrayLength == 0)
                    return;
 
                //-- Copy the data to an array
                Microsoft.Kinect.Skeleton[] data = new Microsoft.Kinect.Skeleton[frame.SkeletonArrayLength];
                frame.CopySkeletonDataTo(data);
 
                //-- Bail if the data wasn't copied
                if (data.Length == 0)
                    return;
 
                //-- Are we tracking?
                if (data[0].TrackingState == Microsoft.Kinect.SkeletonTrackingState.Tracked)
                {
                    //-- data(0) now contains live data
                    Single X = data[0].Joints[Microsoft.Kinect.JointType.HandRight].Position.X;
                    Single Y = data[0].Joints[Microsoft.Kinect.JointType.HandRight].Position.Y;
                    Single Z = data[0].Joints[Microsoft.Kinect.JointType.HandRight].Position.Z;
                    LabelX.Content = X.ToString();
                    LabelY.Content = Y.ToString();
                    LabelZ.Content = Z.ToString();
                    LabelX.UpdateLayout();
                    LabelY.UpdateLayout();
                    LabelZ.UpdateLayout();
                    this.UpdateLayout();
                }
            }
 
        }
    }
 
 
Tuesday
Feb282012

Acoustic Addicts Pilot - A Little More Depth

Now that we've ah ... got your attention with the very well-received Acoustic Addicts pilot episode, we'd like to dig a little deeper into spectral analysis, in higher resulotion than we could provide in the video.

We're going to compare the four guitars featured in the video. I recorded a softly-played drop D chord (the low E string tuned down to a D) on each guitar, and assembled the recordings into a single WAV file, much like we did in the video with recordings of a softly-played E chord.

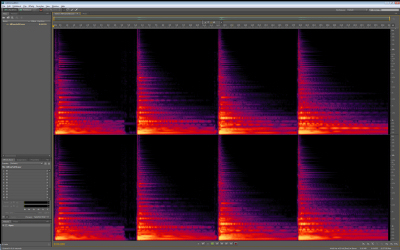
Again, we're using Adobe Audition CS5.5 in Spectral View to do the analysis. Take a look:

(click to enlarge)

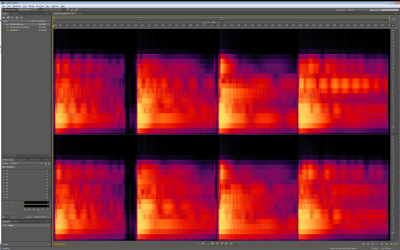
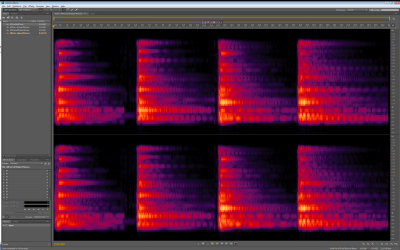
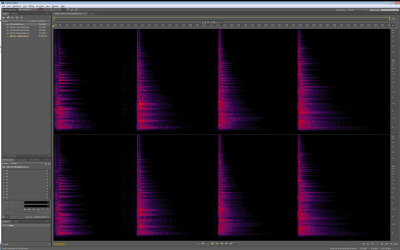
We're looking at a stereo recording with the left channel on top of the right channel. The guitars go in the order that we presented them: 

  • Taylor K-20 (all koa)
  • Taylor 714ce (rosewood back and sides, engelmann spruce top)
  • Santa Cruz Roy Southerner (mahogany back and sides, sitka spruce top)
  • McPherson 4.5 (beeswing mahogany back and sides, adirondack spruce top)

If you recall from the video, the frequency spectrum goes from very low at the bottom of the y axis to very high at the top of the y axis. The brighter the color (closest to white) the louder that range of frequencies is.

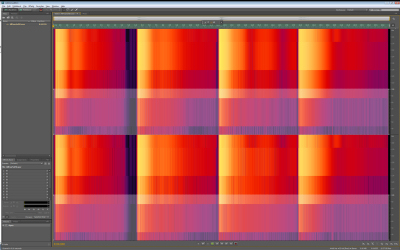
Audition's spectral view has a great feature in which you can select an area across time and frequencies, listen to just that frequency range by pressing the spacebar when a range is selected, and you can copy that range to a new file.

This is what it looks like selecting a range:

(click to elnarge)

Once selected, you can hit spacebar to listen to that selected range of frequencies, or right-click and select Copy To New, which is what we did.

We created four WAV files from the ranges: 

We encourage you to download the wav files and listen along as we look at the spectral make up.

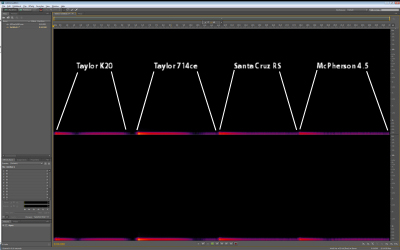
First, the low end. Let's look at what's going on below 100 Hz:

(click to enlarge)

Here we're still looking at the recordings of the same four guitars in the same amount of time. However, like turning down the treble knob, all we're seeing and hearing is the very bottom end (below 100 Hz). 

You can see without zooming in that the 714ce is brighter (louder) in the lower end than the other three, and the low frequencies last longer.

Listen for yourself.

Next, let's look at the lower-midrange (100 Hz to 600 Hz). This is typically the loudest range in an acoustic guitar. It's where the human voice is dominant also. In fact, this range is the hardest to control in recordings, because nearly everything competes for it.

(click to enlarge)

You can see and hear that all of the guitars are loud in this range, but the McPherson sustains the lower midrange the most and the Roy Southerner has lots of great harmonics going on. The Taylors tend to be more controlled in the lower-midrange, meaning there are less overtones jumping out. Did I mention that lower-midrange is the bane of acoustic guitar recording? That's where most people run into trouble if they aren't experienced with microphone and EQ techniques, or they just don't have the ear for it.

It is for this reason we like the 714ce (and the K20) best for accompanying a singer. However, if I was Tommy Emanuel and I wanted the most musically and sonically interesting instrumental guitar track I could get, I'd use the Roy Southerner. There's no singing to compete with, so all those extra harmonics and overtones are welcome. If I was playing strumming songs in a rock band, I'd want the McPherson for the sustain. I'd also consider the McPherson in a bluegrass situation where none of the instruments are miked up close and the guitar has to cut through and sustain on solos.

OK, on to the upper midrange:

(click to enlarge)

In the upper midrange (600 Hz to 3 KHz) there isn't a lot of volume difference, except for the McPherson's incredible sustain. However, each guitar has it's own set of harmonics that when combined with the rest of the freqencies creates a pleasing character. You can hear the bloom (longer cycles that stand out and make it sound like it's getting louder in places - Richard also calls this "jump") in the latter three guitars, but not so much in the K20.

Also, when you're mixing a singer/guitar player live, you'd probably want to cut the very high end to leave room for the vocals (which should have a slight high end boost around 10K), so the high midrange of the guitar becomes the high end. If there's no character up here, your guitar will sound flat and lifeless. All of these guitars have character in the high-midrange.

On to the very top!

(click to enlarge)

The high end (3K and higher) is where you can really see the difference more than hear it when auditioning this range by itself. The K20 is fairly balanced, meaning it has a more limited number of harmonics and nothing really jumps out. The 714ce has a nice boost around 4K. The Santa Cruz has lots of harmonics above 8K, and the McPherson does also, adding a nice belly sound and (of course) sustain.

We hope we have contributed to the global dialogue of acoustic guitar playing and critical listening. All of these guitars are amazing works of art forged with sound science and absolute passion for the craft. We're looking forward to bringing you more sights and sounds on Acoustic Addicts.

Carl Franklin and Richard Caruso